You're probably here because you've come across the need to pass through multiple GPUs to one or more LXC containers on your Proxmox node. Maybe you have a media server that uses a GPU for hardware transcoding, an AI compute node, or, like me, a Hashcat cluster that utilizes GPUs for high-speed password cracking.
Whatever your need, LXC containers are so freakin' awesome. Not only are they super lightweight, but they provide great granularity over how you distribute your hardware. Oh, and not to mention, you can also pass in a GPU to more than one container, privileged or unprivileged (mind you, performance will be shared between the two; you don't just magically get more GPU power).
I should note that my journey started with Ben Passmore’s post over on his site, and this guide uses a lot of what he found to work as well. Anyways, here's what you need, and what I''ll assume you already have set up.
- Proxmox 7 Host
- 2 or more GPUs (I use an Nvidia GTX 980 and a GTX 1080)
- One or more LXC containers (I used Ubuntu 20.04)
The official Nvidia docs for installing the drivers can be found here. I'll give a quick rundown of how this should work. We're going to add Nvidia's repository on both the host and the container so that we hopefully get matching driver versions, regardless of what's available from the package manager for our distro.
First, SSH into your Proxmox host and install a few packages.
apt install pve-headers build-essential software-properties-common
Given that I require CUDA to do my work, I'll go ahead and add the CUDA repository. This should also install the traditional drivers as well.
add-apt-repository "deb https://developer.download.nvidia.com/compute/cuda/repos/debian11/x86_64/ /"
apt-key adv --fetch-keys https://developer.download.nvidia.com/compute/cuda/repos/debian11/x86_64/3bf863cc.pub
add-apt-repository contrib
apt update
apt -y install cuda
This will probably take a hot minute, so maybe grab a bowl of cereal or something. I like Fruity Pebbles.
When it finishes, let's create a udev rule so we can see our GPUs. Create the file /etc/udev/rules.d/70-nvidia.rules and fill it with the following:
# Create /nvidia0, /dev/nvidia1 … and /nvidiactl when nvidia module is loaded
KERNEL=="nvidia", RUN+="/bin/bash -c '/usr/bin/nvidia-smi -L && /bin/chmod 666 /dev/nvidia*'"
# Create the CUDA node when nvidia_uvm CUDA module is loaded
KERNEL=="nvidia_uvm", RUN+="/bin/bash -c '/usr/bin/nvidia-modprobe -c0 -u && /bin/chmod 0666 /dev/nvidia-uvm*'"
Now, when this is done, do a quick reboot and we should be able to see our GPUs with nvidia-smi. If not, you may need to load up the nvidia-uvm module into the kernel: sudo modprobe nvidia-uvm and try again.
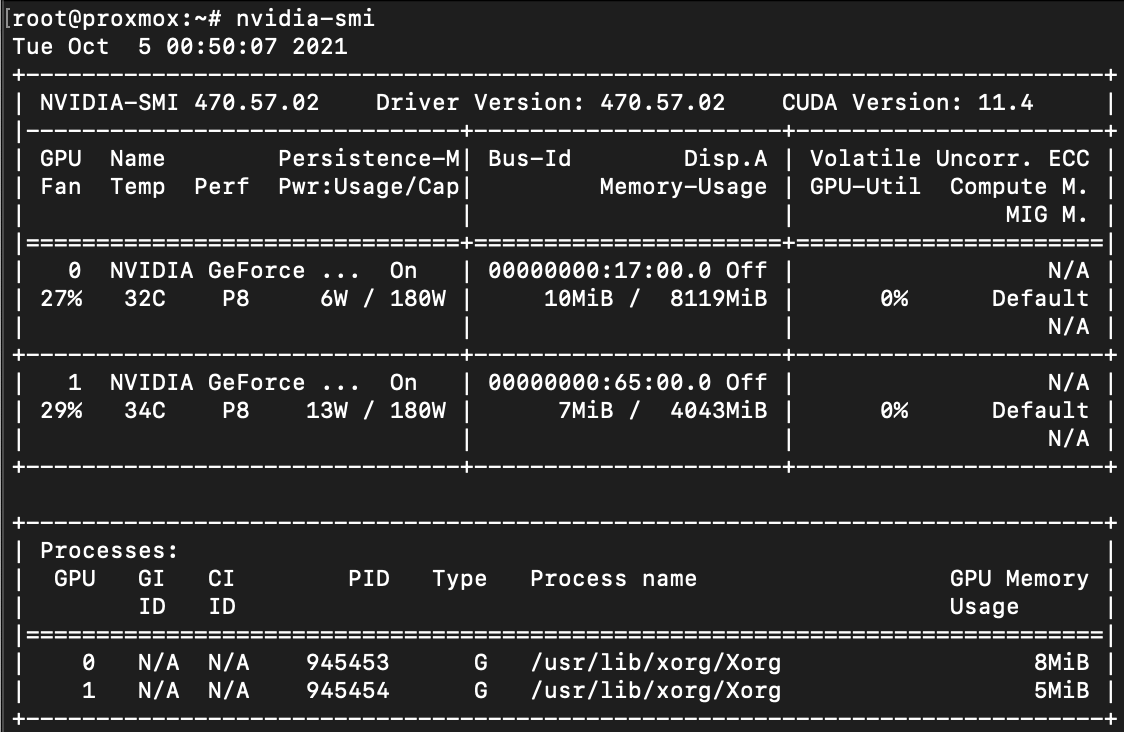
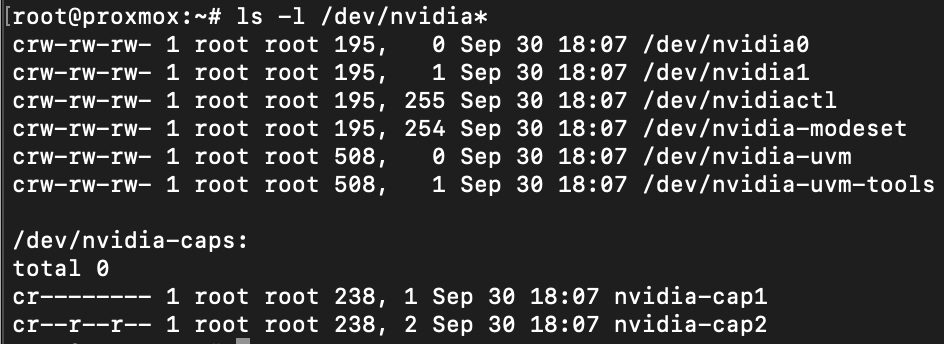
Additionally, we should be able to see two cards at /dev/nvidia0 and /dev/nvidia1. Let’s make a note of the 5th column, 195 and 508. These are known as the cgroup values.
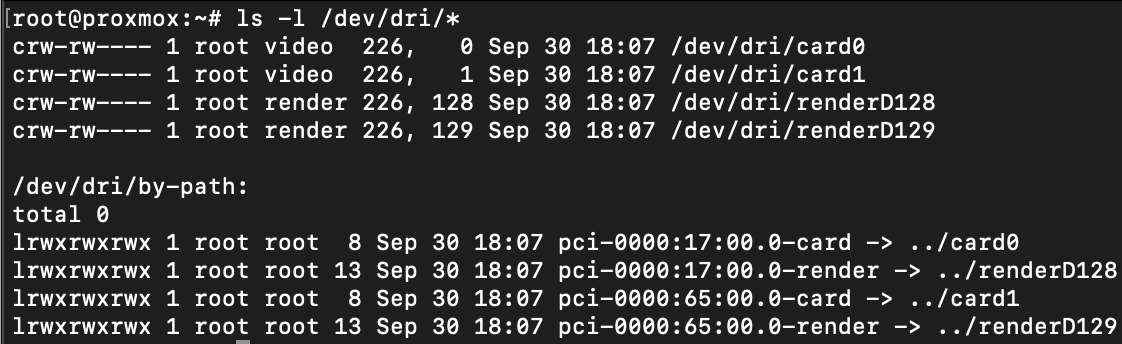
Further, since we're going to be transcoding, let's check /dev/dri for our rendering devices as well. Again, let's make a note of the 5th column, 226. Please note that these numbers will likely be different for your machine, and may change if/when a driver is updated. You may need to update your container configs after a driver update.
One of the notable changes from Proxmox 6 to 7 that caused me a lot of head banging and maybe a few concussions is the move from cgroup to cgroup2. A cgroup, or control group, basically allows you to allocate resources, which is exactly what we need to do. Those numbers we wrote down are groups for our GPUs devices that we will need to pass through to our containers.
I've found it's generally safe to assume that column 6 is associated with /dev/nvidiaX or /dev/dri/cardX - aka if column 6 is a 1, then it'll be associated with /dev/nvidia1, etc. In my setup, I have 2 containers - one is my Hashcat node (container ID 101), and the other is my Jellyfin instance (container ID 109). Now, I've already briefly mentioned my requirements, but I'll reiterate here. I'd like to have both GPUs available to my Hashcat instance, but only my GTX 1080 available to Jellyfin, as Jellyfin can only use one GPU at a time.
Let's set up our Hashcat container first. Go ahead and open back up your SSH connection to your Proxmox node. Your LXC containers should be at /etc/pve/lxc/xxx.conf, where xxx is the container ID. We're going to add in a few lines to the bottom. Mine looks like this:
lxc.cgroup2.devices.allow: c 195:* rwm
lxc.cgroup2.devices.allow: c 508:* rwm
lxc.cgroup2.devices.allow: c 226:* rwm
lxc.mount.entry: /dev/nvidia0 dev/nvidia0 none bind,optional,create=file
lxc.mount.entry: /dev/nvidia1 dev/nvidia1 none bind,optional,create=file
lxc.mount.entry: /dev/nvidiactl dev/nvidiactl none bind,optional,create=file
lxc.mount.entry: /dev/nvidia-uvm dev/nvidia-uvm none bind,optional,create=file
lxc.mount.entry: /dev/nvidia-modeset dev/nvidia-modeset none bind,optional,create=file
lxc.mount.entry: /dev/nvidia-uvm-tools dev/nvidia-uvm-tools none bind,optional,create=file
The first 3 lines are allowing access to the cgroups we took down earlier. You can be more granular with your permissions and add a line for each file you want to give access, just change the * to the value in the 6th column from above. I'll have an example of this later.
The 4th and 5th lines allow access to both GPUs.
The remaining lines allow access to some cli and device control tools. Now, go ahead and restart the container.
Once it fires back up, we're going to follow almost the same install process to install the Nvidia drivers in our first container. Additionally, we are going to prioritize the Nvidia drivers over Ubuntu's included drivers. For Ubuntu 20, it�'ll look something like this:
sudo apt install build-essential software-properties-common
sudo apt-key adv --fetch-keys https://developer.download.nvidia.com/compute/cuda/repos/ubuntu2004/x86_64/3bf863cc.pub
sudo add-apt-repository "deb https://developer.download.nvidia.com/compute/cuda/repos/ubuntu2004/x86_64/ /"
wget https://developer.download.nvidia.com/compute/cuda/repos/ubuntu2004/x86_64/cuda-ubuntu2004.pin
sudo mv cuda-ubuntu2004.pin /etc/apt/preferences.d/cuda-repository-pin-600
sudo apt update
sudo apt -y install cuda
Now, go ahead and restart your container one more time, then run nvidia-smi inside the container and you should see your GPUs.
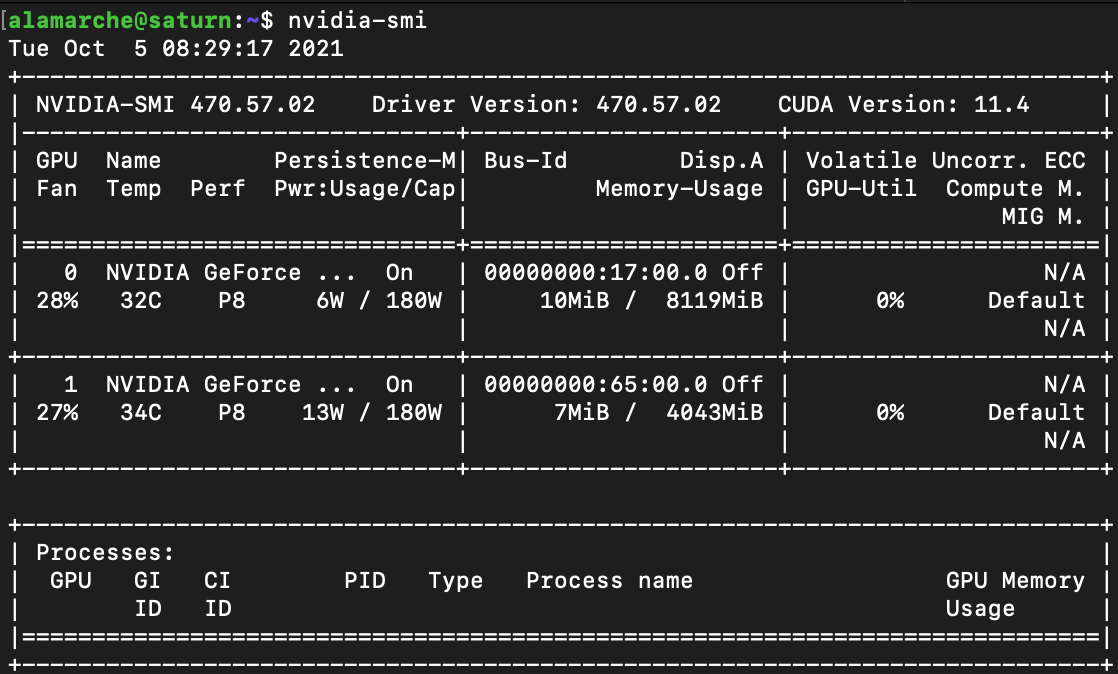
We can see both GPUs have been successfully passed through!
For our Jellyfin container, you can follow the same steps as just above to install the drivers, and the rest of the process will be nearly identical, except we're only going to pass in one GPU and we also need to allow rendering access. Again, open up /etc/pve/lxc/xxx.conf, where xxx is the container ID of the second container and append the following lines:
lxc.cgroup2.devices.allow: c 195:0 rwm
lxc.cgroup2.devices.allow: c 195:254 rwm
lxc.cgroup2.devices.allow: c 195:255 rwm
lxc.cgroup2.devices.allow: c 508:* rwm
lxc.cgroup2.devices.allow: c 226:0 rwm
lxc.cgroup2.devices.allow: c 226:128 rwm
lxc.mount.entry: /dev/nvidia0 dev/nvidia0 none bind,optional,create=file
lxc.mount.entry: /dev/nvidiactl dev/nvidiactl none bind,optional,create=file
lxc.mount.entry: /dev/nvidia-uvm dev/nvidia-uvm none bind,optional,create=file
lxc.mount.entry: /dev/nvidia-modeset dev/nvidia-modeset none bind,optional,create=file
lxc.mount.entry: /dev/nvidia-uvm-tools dev/nvidia-uvm-tools none bind,optional,create=file
lxc.mount.entry: /dev/dri dev/dri none bind,optional,create=dir
Here's an example of only allowing access to one single GPU. Unfortunately, I haven't found a quick-n-easy way to tell which card is which (/dev/nvidia0, /dev/nvidia1) without just firing up the container and looking for myself. Anyways, I discovered that /dev/nvidia0 is my GTX 1080, so I'll pass that one in, but you'll notice that I also pass in /dev/dri which allows me access to rendering hardware so that I can transcode.
Again, go ahead and reboot the container and then we should be able to see the GPU in nvidia-smi.
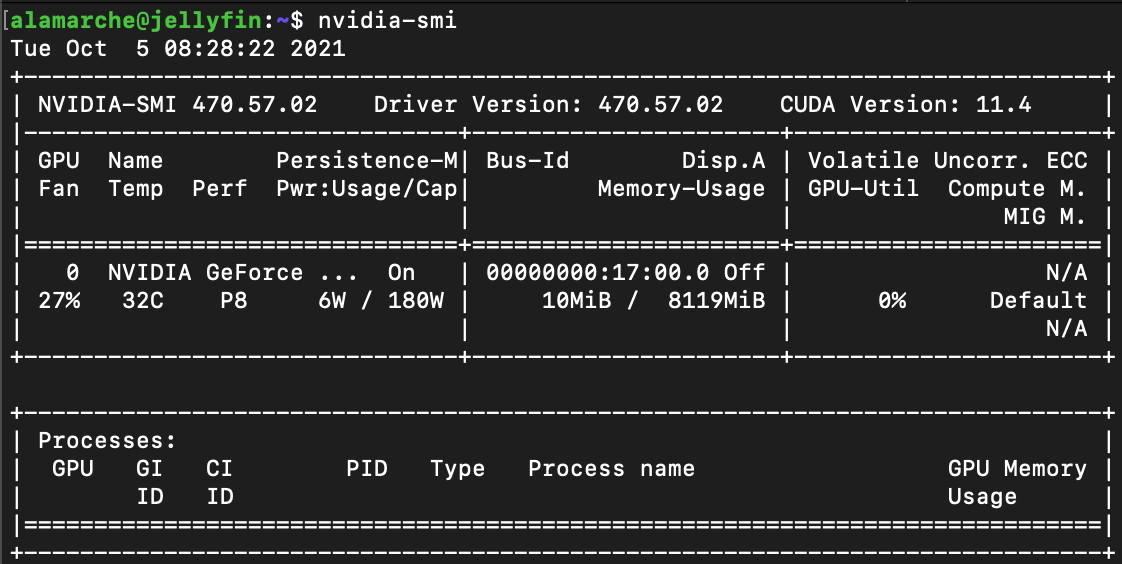
Here we see only the GTX 1080, which is exactly what we want. If you have questions or comments, feel free to reach out on Twitter.